The StrideLinx router is the hardware component which enables you to remotely access your machine as if you are on-site, but it first needs to be registered in the StrideLinx Cloud using one of two methods:
- Easy method: using a configuration file and USB flash drive.
- Advanced method: through the StrideLinx router's local web interface.
This article explains how to set up your StrideLinx router to connect via a cellular connection, using the easy method, but you can later change this to a different connection type if that better suits the situation.
After your StrideLinx router is set up, you will be able to access and manage your StrideLinx router from within the StrideLinx Cloud. You can then also add the unused connection types (wired, wireless, cellular) as backup connections, using failover.
- StrideLinx Cloud account
- StrideLinx router
- USB flash drive (format: FAT/FAT32)
The steps to follow in order to set up your StrideLinx router are:
Create a configuration file
Important: before you begin
- StrideLinx has partnered with Enabling Elements to provide free AT&T sim cards with each StrideLinx cellular router. Email stridelinx@enablingelements.com to create your account with Enabling Elements and activate your sim card.
- The Enabling Elements AT&T APN (access point name) is m2m005248.attz.
- Required info: provider's APN (access point name) and SIM card's PIN code.
- Make sure the SIM card has sufficient internet credit.
- Make sure that it is activated (contact your provider if necessary).
- Antenna connector: The 4G/LTE models have 2 SMA connectors for your cellular antenna. The one closest to the power connector is the MAIN and the other connector is the DIV. Always connect an antenna to the MAIN. Connecting an antenna to the DIV is optional and never required.
- Insert the mini SIM card (2FF) before you power on the StrideLinx router.

The StrideLinx router uses a mini SIM (2FF) for cellular connections
You will need to create a configuration file to register the StrideLinx router in the StrideLinx Cloud. The company in which the configuration file is created, is the company where the StrideLinx router will register itself.
Some settings in the configuration file wizard may already be pre-filled, based on common use cases, to simplify the configuration process. To get to the configuration file wizard:
- Go to the StrideLinx Cloud Fleet Manager app, which is also accessible via the Apps menu
 in the top right corner if you are currently in a different StrideLinx Cloud app.
 - Open the main menu
 and select Tools
  , now click on [Start configuration] for the Router config-file.
You will be presented with different connection types for the initial registration in the StrideLinx Cloud. Note that you can later change the primary connection type, and other settings, if needed.
- Select the connection type "Cellular network" and click [Next] to continue.
- Enter the cellular information (details below) and click [Next].
Field Description PIN If there is no PIN code set on the SIM card, you can leave the "PIN code"-field empty. Note that PIN "0000" is not an empty PIN. APN Enter the provider's APN and the SIM card's PIN code and click [Next]. Standard APNs are listed below, but if you are unsure about which APN to enter, search online or contact the provider directly.
-
- Enabling Elements AT&T APN is m2m005248.attz.
- AT&T APN through their m2m marketplace is m2m.com.attz.
- Verizon APN is vzwinternet.
- T-Mobile APN is fast.t-mobile.com.
Username and password
(available when a manual APN is set)Some cellular providers require a username and password, in addition to an APN, to allow the SIM card to connect to the cellular network (requires firmware 3.22 or higher). MTU size for Verizon SIM cards, a MTU value of 1200 is required.
AT&T operates with the value of 1500. -
- If your customer wants to have on-site control over when remote access (VPN) is enabled, please select "Local control over remote accessibility" and choose one of the available options. More information about this feature, including electrotechnical details, can be found here. Click [Next].
- Enter a unique IP address for the StrideLinx router's LAN (machine network). Note that this IP address needs to be in the same range as the machine and that its last number needs to be different from the machine to prevent an IP conflict.
- Click [Download file] to download the generated file, called router.conf, and save the file to the root directory of a USB flash drive. You may exit the configuration tool by clicking the X in the upper left corner.
Register your StrideLinx router
Once the configuration file is placed on a USB flash drive, you can start registering your StrideLinx router.
- Connect the antenna to the StrideLinx router's MAIN or 4G SMA connector, depending on which StrideLinx router model you have, and insert the SIM card into the StrideLinx router.
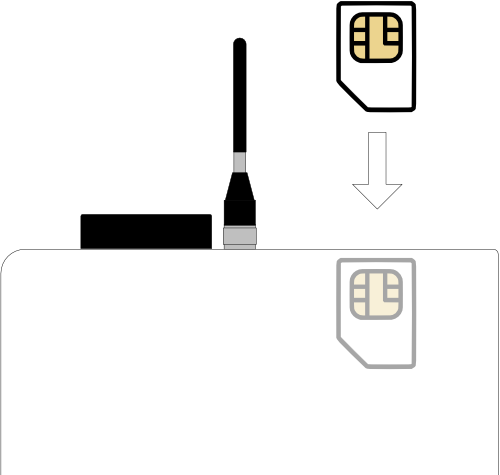
The SIM card should be inserted into the StrideLinx router as shown in the picture
- Power on your StrideLinx router. Please consult the installation manual for details about the recommended power supply and wiring details.
- Insert the USB flash drive into the StrideLinx router's USB port.
- Wait around 2 minutes for the StrideLinx router to configure and register itself.
ACT (activity) LED status
The StrideLinx router's ACT LED should blink blue quickly shortly after inserting the USB flash drive, indicating that the StrideLinx router is configuring itself.
If this hasn't happened after 1 minute, please check that the file is located in the root directory of the USB flash drive and that the file name is exactly "router.conf". Try a different USB flash drive if the problem persists.
After roughly 2 minutes, the StrideLinx router's ACT LED should be solid blue, indicating that it's registered in the StrideLinx Cloud.
View our troubleshooting article for details about other ACT LED statuses.Remove the USB flash drive
When the StrideLinx router is powered on, it reads all settings from the configuration file on the USB flash drive. Be sure to remove the USB flash drive once the StrideLinx router is registered. This prevents any later changes you make via the StrideLinx Cloud to be overwritten with the old settings in the configuration file.
Activate your StrideLinx router
After a successful registration of your StrideLinx router, you can activate your StrideLinx router, making it ready for use.
- Go back to the StrideLinx Cloud Fleet Manager app, which is accessible from the Apps menu in the top right corner if you are currently in a different StrideLinx Cloud app.
- Open the main menu , and select Devices
 .
.
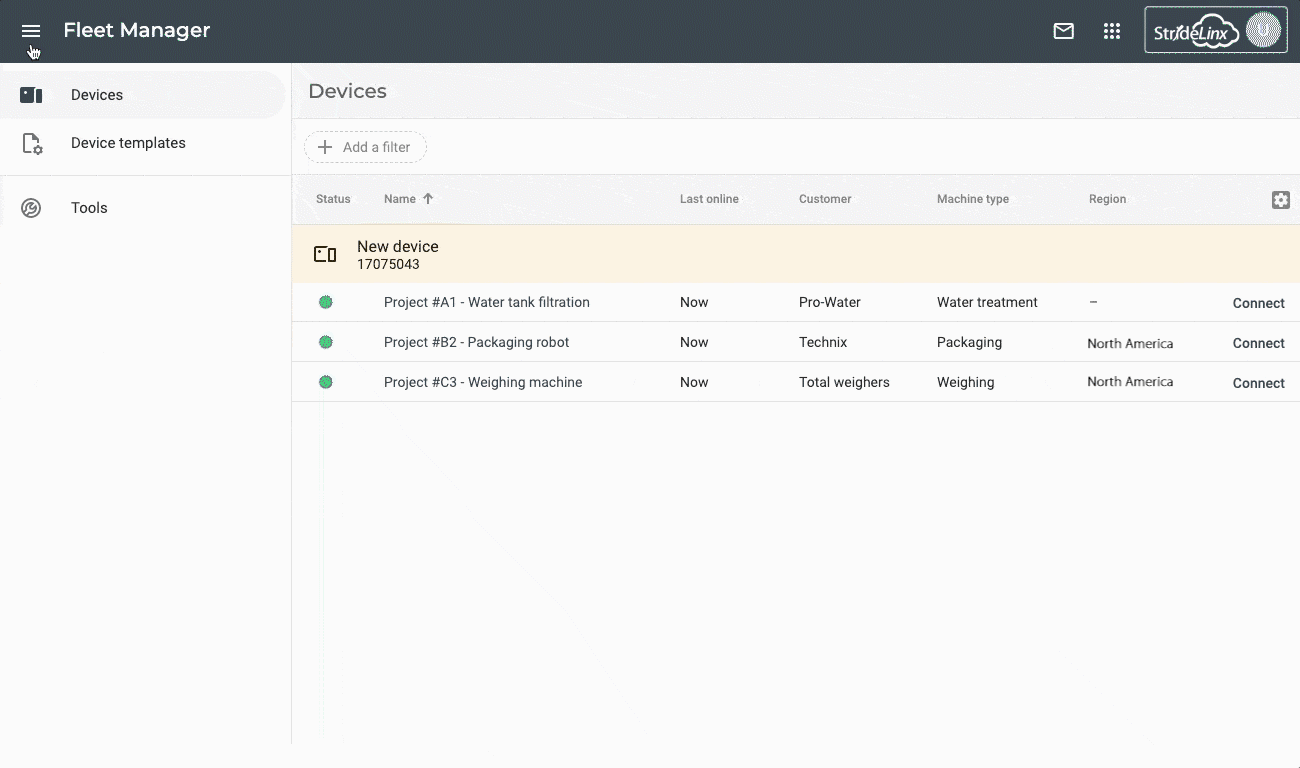
You will find a yellow bar at the top of your devices list, saying "New device". It also mentions your StrideLinx router's serial number (e.g. 17055202), which you can verify with the serial number on the side of the StrideLinx router.
- Click the yellow bar, name your device as you see fit and select [Activate].
Help, I don't see a yellow bar.
Please read our troubleshooting article to get your StrideLinx router online.Next step
The StrideLinx router is now set up and activated. You can now connect to your machine.